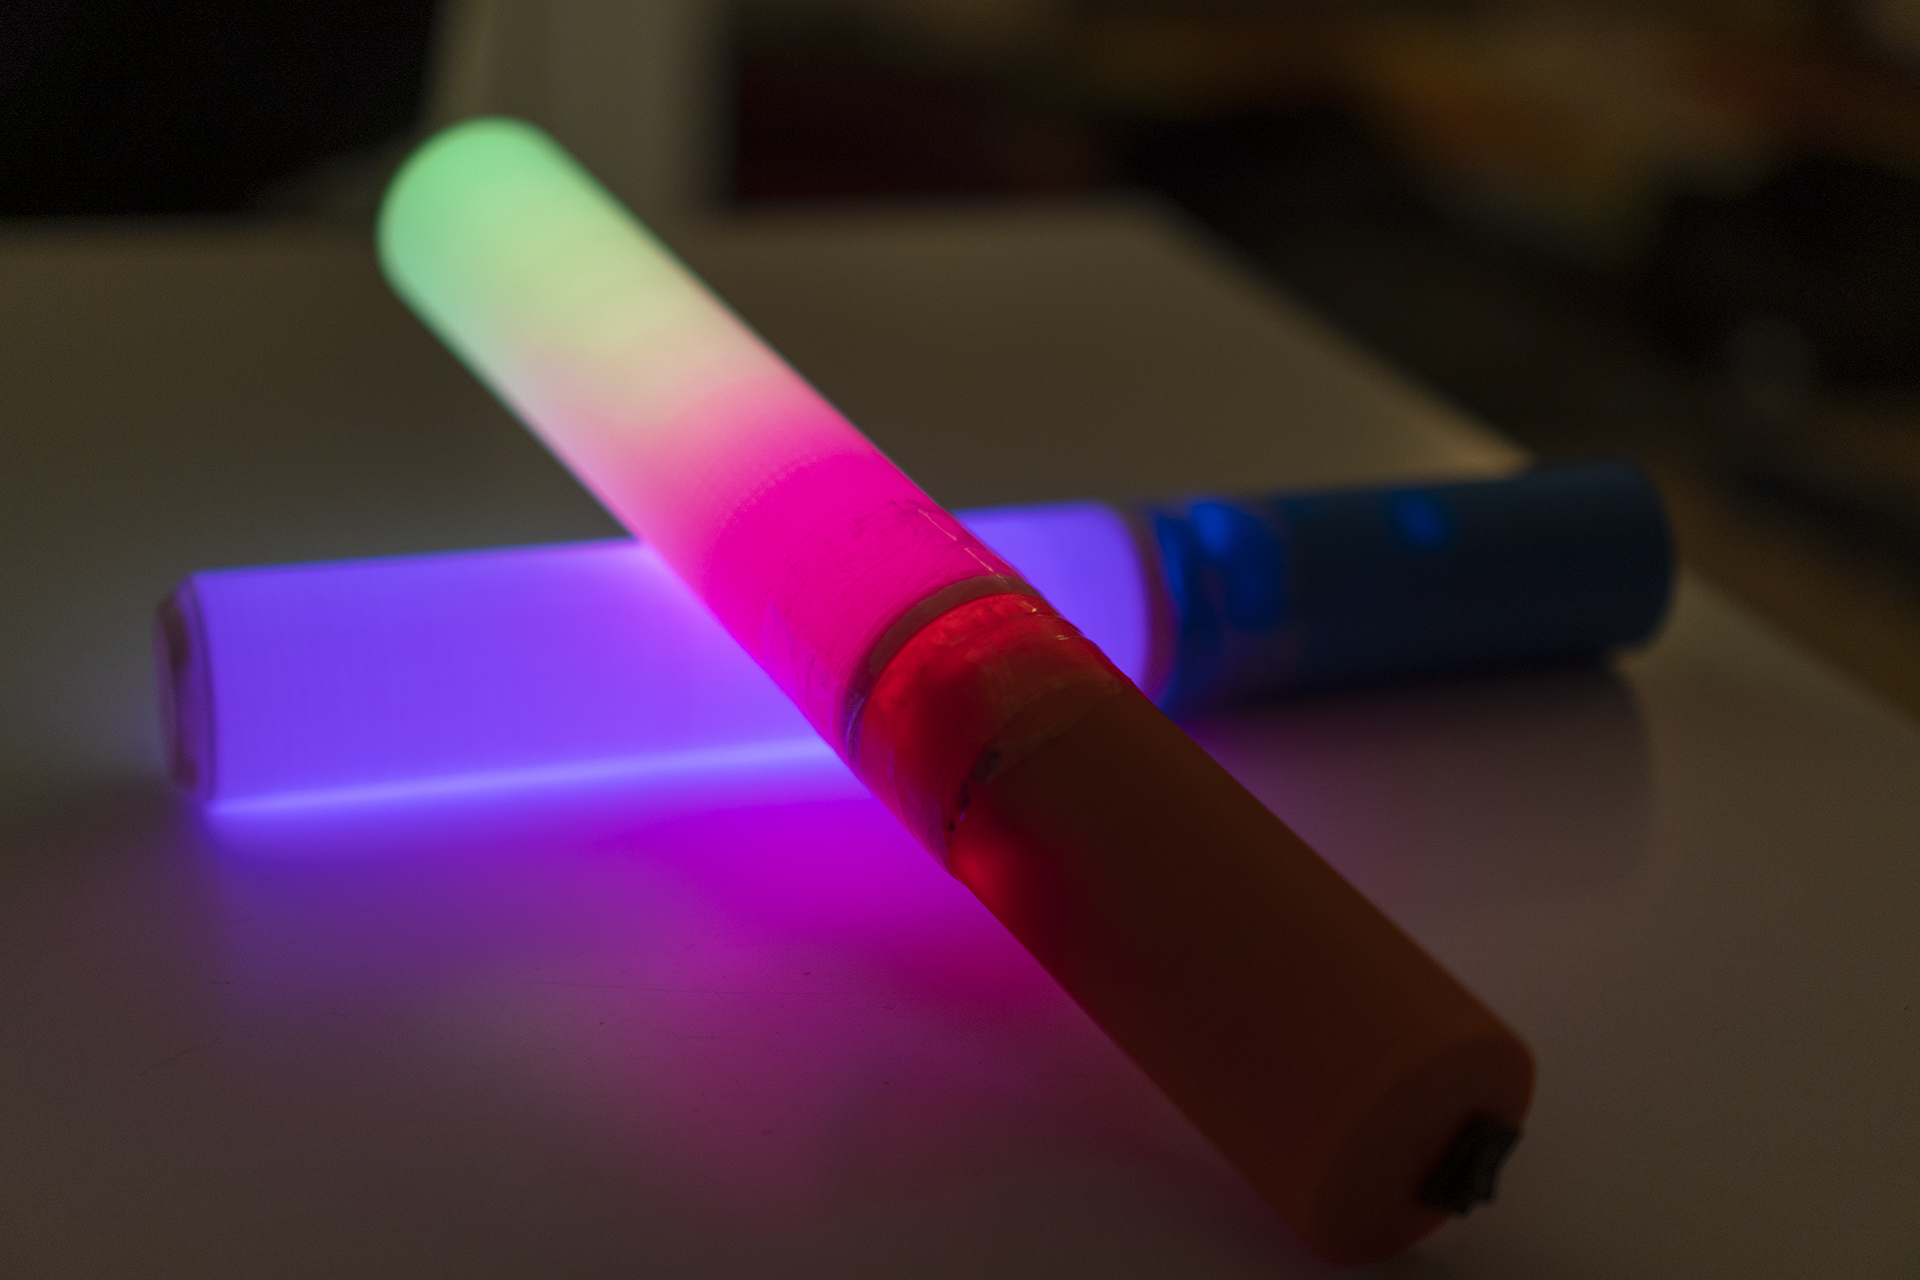
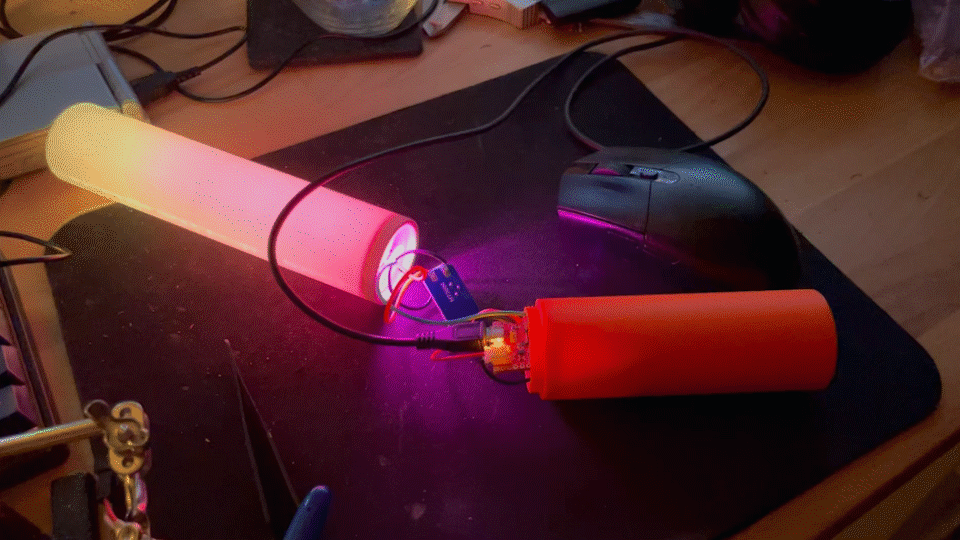
A good friend of mine was having her 30th birthday party. The party had a disco/rave room, where everyone went and had a good time dancing to the music. While the world itself is what it currently is, I decided to bunker down for 2 weeks to make sure that I would not spread any diseases to my good friends. This made it impossible to go and get epic rave gear. To come up with something, I decided to start making a rave stick with addressable LEDs! To my confusion, I could not find any similar project released as an open source project. The electronics within this project can easily be translated to cosplay projects or whatever else 😊 The files are available on Thingiverse.
The project
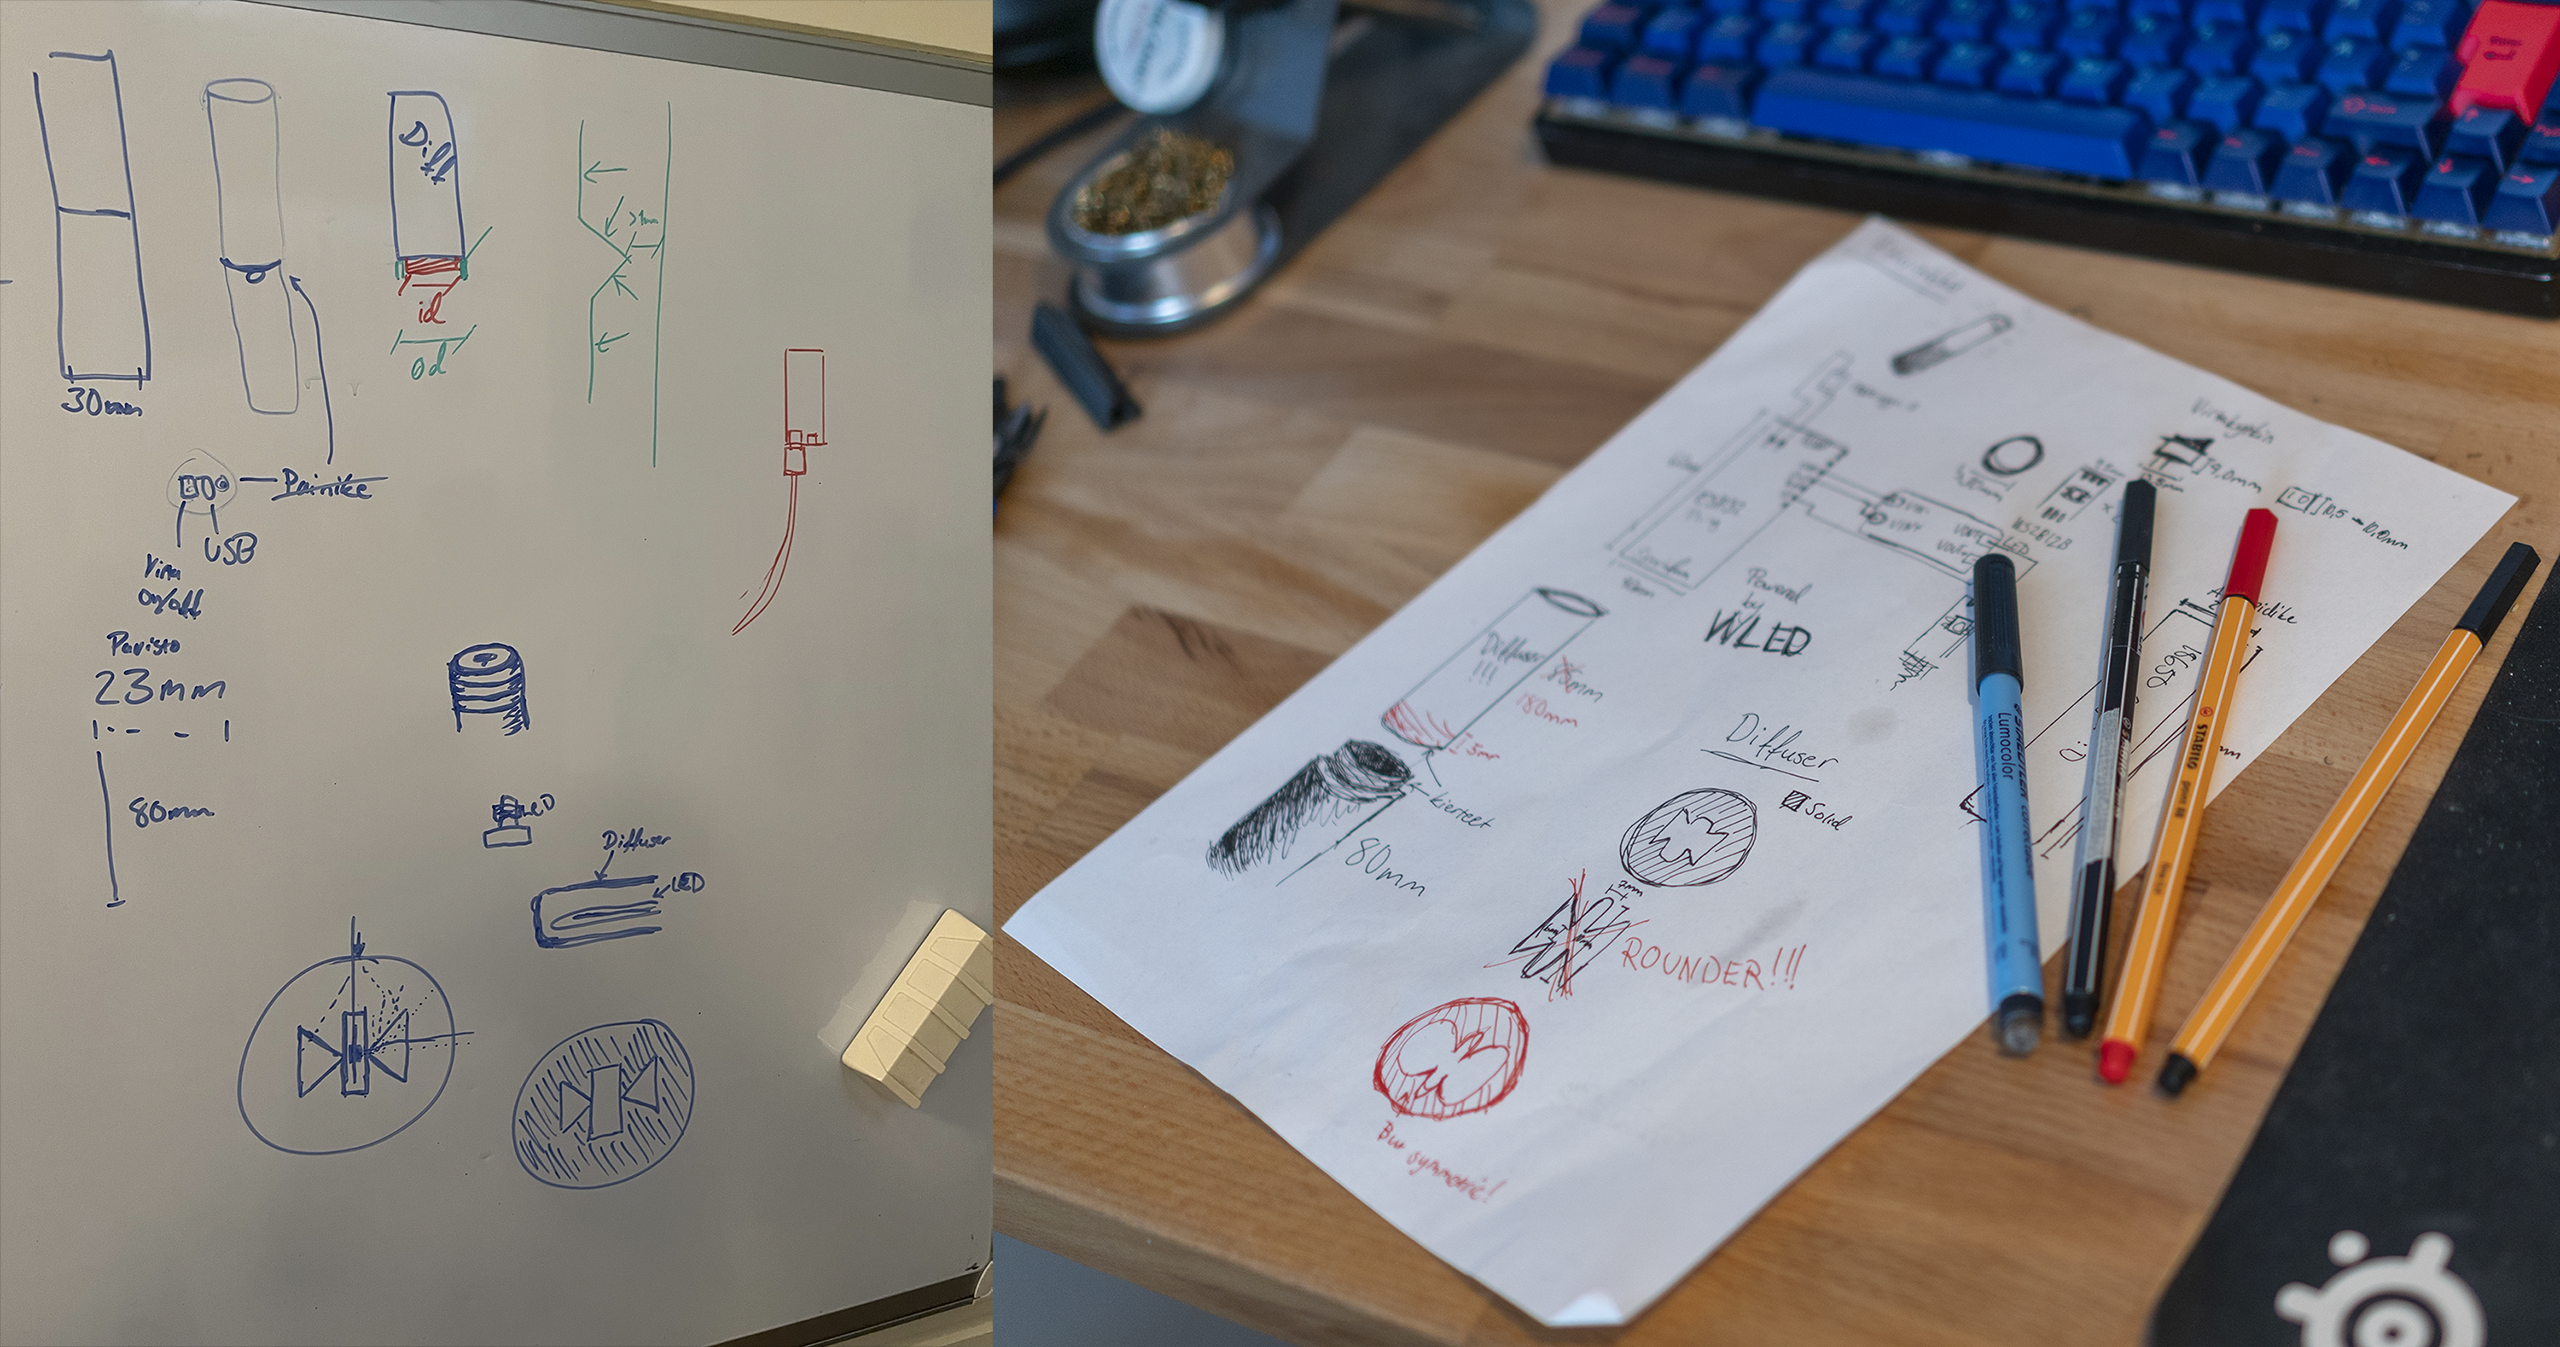
Yet again, I managed to open my mouth for my friend a few weeks before the deadline - the birthday party. He gave me good ideas on where to start and how to design the model.
The end product should:
- have blinking lights
- have a chargeable battery
- be 3D-printable
- be simple
- not explode
These things in mind, we drafted a little sketch with Heikki Juva.
Bill of materials
With all these things in mind, the following parts were chosen for the project
| Product | Name |
|---|---|
| Controller | SparkFun ESP32 Thing |
| LEDs | WS2812 LED strip |
| Battery | Ansmann 18650 3500mAh battery |
| Battery holder | Generic 18650 battery holder |
| On/off switch | Generic rocker toggle switch |
| Step-up converter | Step-Up Adjustable DC-DC Switching Boost Converter |
| Cables | 28 AWG wiring |
Controller
](/images/ravestick/sparkfun_esp32thing.png)
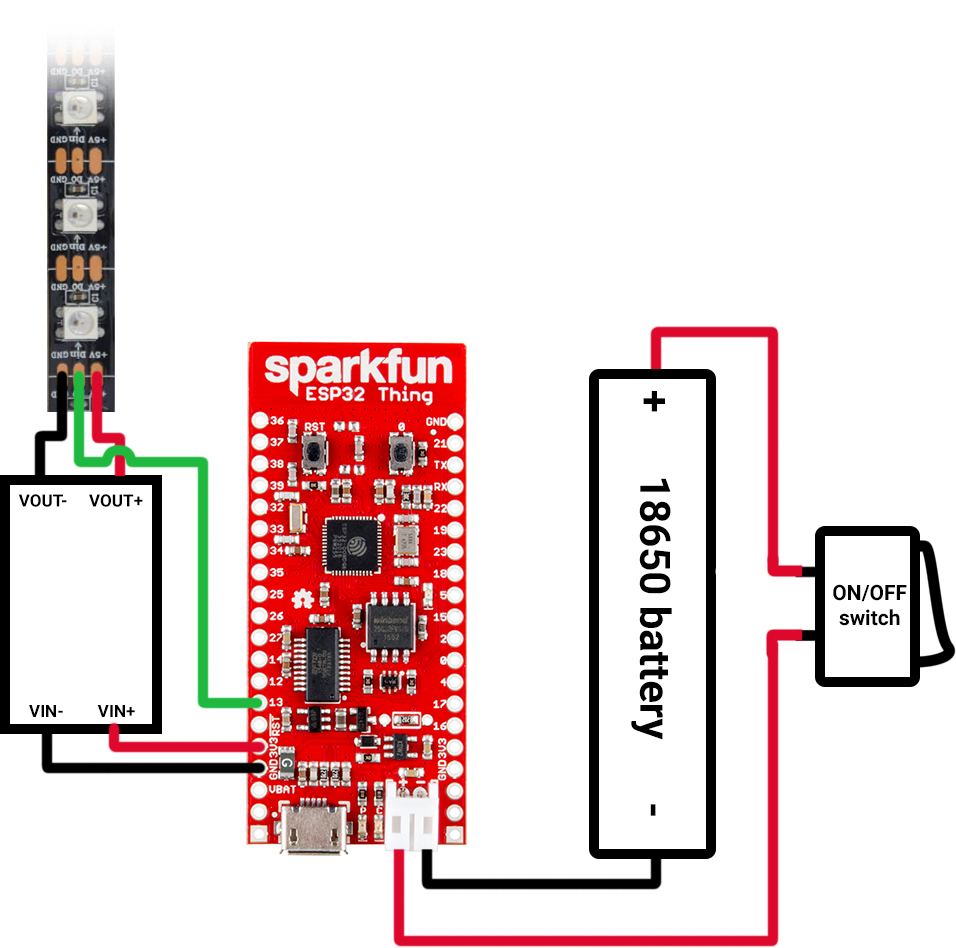
SparkFun ESP32 Thing was chosen because it has several amazingly good features for this project. ESP32 Thing is a great devboard featuring an integrated LiPo charger. Also my friend happened to have an extra few 😅 Only downside is that it does not have a 5V power pinout for powering the LED strip. We can get around this by putting a step-up converter in between to crank up the 3,3V output to 5V.
SparkFun is a quality vendor and trustable. By going with this the product was one step closer of one of our requirements; it should not explode. The thing that might explode of course is…
Battery
](/images/ravestick/battery.png)
[Ansmann 18650 3500mAh battery](https://www.verkkokauppa.com/fi/product/55903/qbjkd/Ansmann-18650-akkuparisto-3500mAh)
LEDs
You can get really cheap NeoPixel clones from Aliexpress. I have a few meters of WS2812 with different amount of LEDs per meter. For this project, I went with 60 LEDs per meter and IP30 rating. Putting too many LEDs on at the same time requires more electricity! I tested with a denser LED strip as well, but with 44 LEDs the microcontroller was very unstable. I decided to downgrade to 20 LEDs (10 for each side). 😢 But with less LEDs, we can make the few LEDs we have a little bit more brighter as well! Yay!
3D modeling
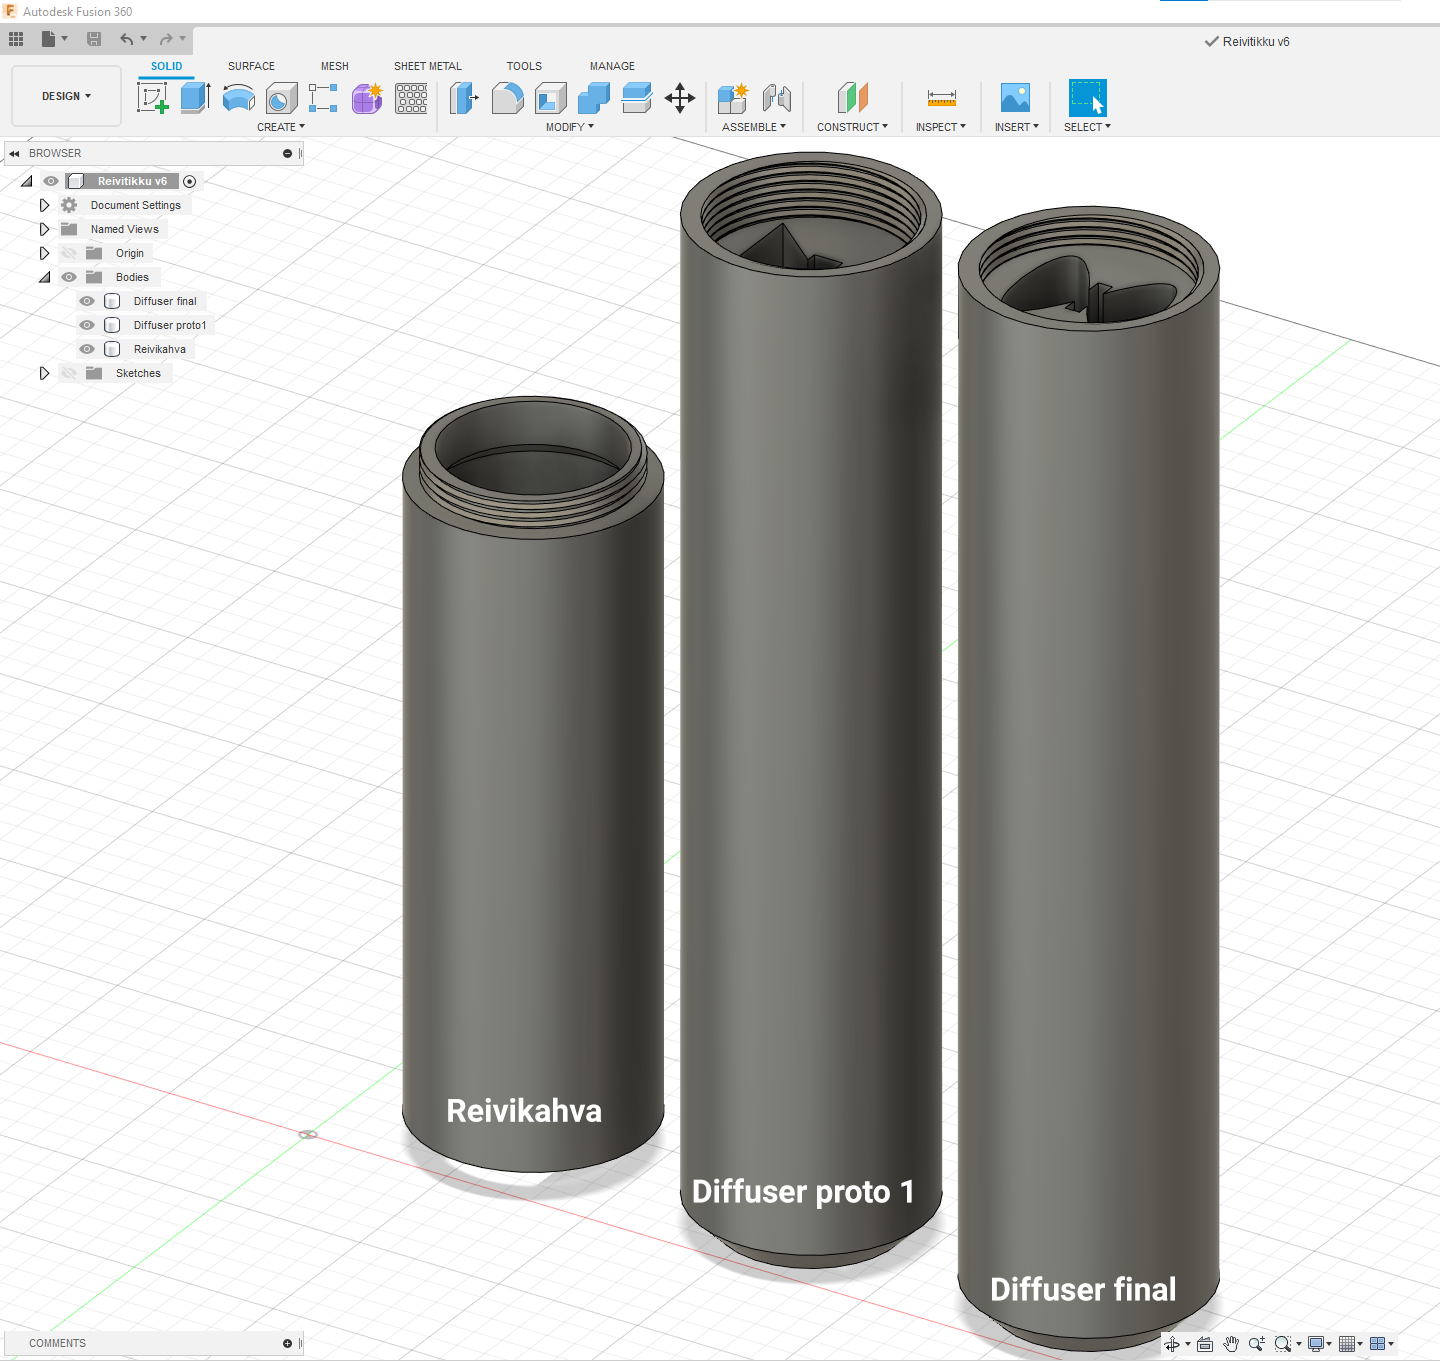
I fired up the Fusion360 and started doing the stuff. I like to do measuring before going in to the CAD itself and writing everything down (ref. the earlier sketches) and re-measuring everything while doing the models.
All the parts went through small changes, mostly making things wider or longer. Owning your own 3D printer makes the prototyping such a joy.
The diffuser part required the most prototyping I’ve ever done. Goal was to diffuse the LEDs light so that you can’t see the parts which are not directly illuminated by the LEDs. The diffuser will be sanded downto hide the layer changes from 3D printing. Therefore the diffuser was printed from PETG plastic (white) since it’s better to sand than PLA. I started with 320 grit and ended up with 1200. The final sanded version had a cool frosty effect on it, which is hard to capture on the camera!
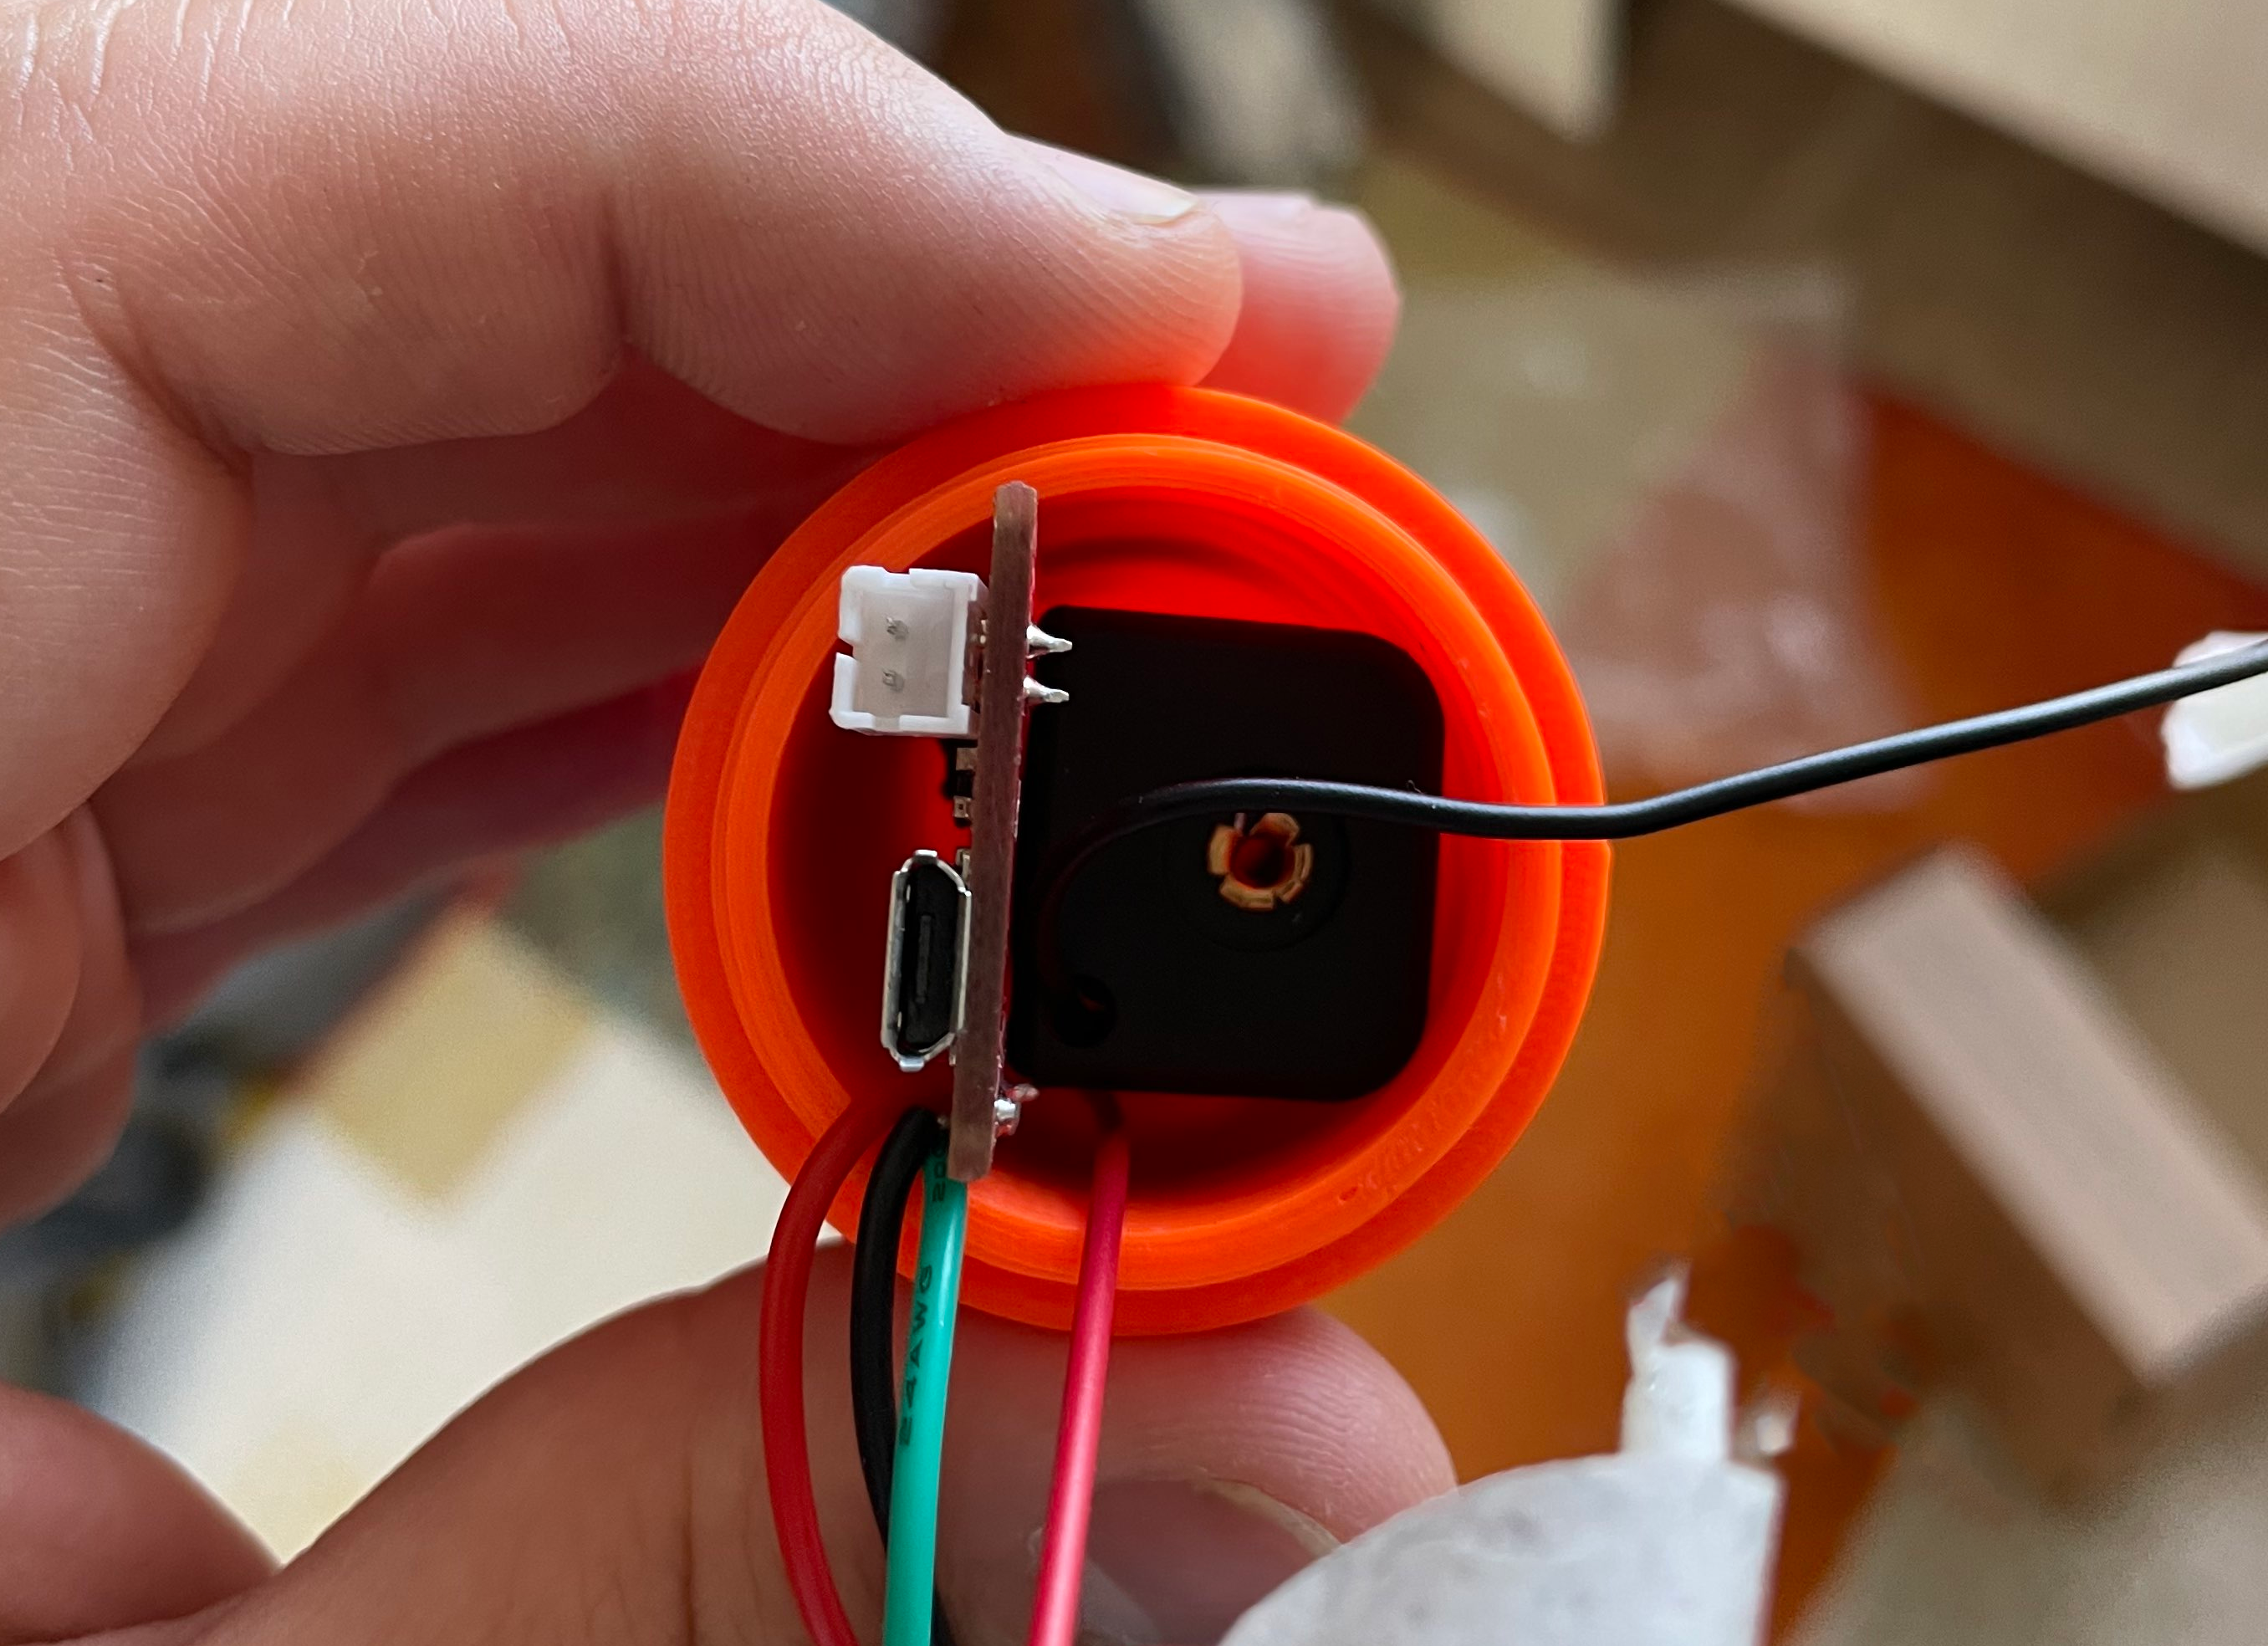
Electronics
ESP32 Thing pretty much is the brains of this project. The pinout is simple and nicely written in the silkscreen. I early mentioned that the ESP32 Thing gives out only 3,3 volts, when our LEDs requres 5V. That’s why we need to put a step up converter in between to power the LEDs. The battery is connected to the toggle switch as well. I just wanted to make a physical on/off switch for the battery. You could skip this and just add a deep sleep to your code or something. I like physical buttons 😊
Some of the comments from @Heikki Juva
- I could have used
VBATpinout instead of3V3. This might have caused my ESP32 to be unstable with higher amount of LEDs - Even a better option would have been to take the
+straight from battery and take it to Step-Up converter’sVIN+directly
Keep these in mind, if you are going to make your own rave stick 😁
Software
I decided to go with a neat little software called WLED. WLED hosts a webserver from which you are able to add your configurations and everything over WiFi. There is also a quite handy app for iOS and Android. Since we are wanting a highly mobile setup for our raves, this sounds amazing.
The installation is extremely simple (unless you want to compile your own WLED binaries). Just go to the install.wled.me with your ESP-based controller insterted and you can flash it over there. It was a neat little experience and I’ve never seen any other site do the same. It was magical. Of course there are concerns about this impelmentation. WLED’s repository has loads of cool tutorials linked from people who know about their stuff. At least more than me!
By default, the WLED also hosts a WiFi access point, which you can connect via your mobile phone. The initial setup should be done here. There are a few default settings that I wanted to change. First thing was to change LED PIN from 0 to 13. I decided to go with 13 to make the cabling look neat 😊 Your mileage may vary and using 0 is a valid choice. The UI seems like its amazing, and for the most of the parts it is, but some stuff just isn’t that intuitive. For example, changing the default preset to something else than the default warm white.
Post Mortem
The sticks themselves were amazing. We had lots of fun times with them.
The bigges downside, of coruse, was the model design. Designing two parts to be joined together via threads was a bad idea or the implementation wasn’t perfect. The LEDs’ wires became twisted and I had to swap from LED connectors to just soldering flexible silicone wires straight to the LEDs. That wasn’t such a bad thing, but structually the thread was also the weakest part of the handle. When people are having fun and waving their epic rave sticks, it’s possible that they might drop the sticks. And they did. And the threaded part broke down after the first drop. Luckily the design was amazingly simple so they could easily be fixed by using tape.
The design itself is not perfect in any other way, but I think the diffuser pattern was really good. The handle should be redesigned with the following things in mind:
- Make the diffuser & handle attach mechanism stronger
- Screws? Heat inserts? Who knows
- USB-port for charging the battery
- USB-C female connectors were on their way >:3
- Add a button for changing the lightning effect or something
But our requirements were filled!
- It had blinking lights
- It had a chargeable battery
- It was 3D-printable
- It was simple
- It did not explode
Hope you enjoyed the read. I know I did ♥